 I'll make details with sculpt tools so the surface of these pants are almost flat so far. Now the legs are inside pants but they will be deleted.
Monday, June 30, 2008
A rider (4)
I've started making clothes.
 I'll make details with sculpt tools so the surface of these pants are almost flat so far. Now the legs are inside pants but they will be deleted.
I'll make details with sculpt tools so the surface of these pants are almost flat so far. Now the legs are inside pants but they will be deleted.
Monday, June 23, 2008
Subdivision surface test
I've compared subdivision surface in modo and XSI.
 The original model is at the top of the image. A model in the right is applyed SDS in modo and then freezed. "Linear UVs" was checked before freezing. A model in the left is applyed Catmull-Clark subdivision surface in XSI. In UV, "Smooth when subdividing" is unchecked.
In the result, the UVs look similar. I think there will be no problem( or few problems) in UVs. In the mesh there is a problem that XSI's result is slightly larger than modo's. As far as I know, this kind of difference could be small if the mesh has enough of edges. In the rider's model there are enough edges except for the top of the head and teeth. I'll add edges to them to avoid the problem.

 The original model is at the top of the image. A model in the right is applyed SDS in modo and then freezed. "Linear UVs" was checked before freezing. A model in the left is applyed Catmull-Clark subdivision surface in XSI. In UV, "Smooth when subdividing" is unchecked.
 In the result, the UVs look similar. I think there will be no problem( or few problems) in UVs. In the mesh there is a problem that XSI's result is slightly larger than modo's. As far as I know, this kind of difference could be small if the mesh has enough of edges. In the rider's model there are enough edges except for the top of the head and teeth. I'll add edges to them to avoid the problem.
By the way, I improved the rider's model a little bit. I've adjusted the rider's upper body and added some details around the belly.
Saturday, June 21, 2008
A rider (3)
I've finished making the rider's base model.
 I put all details on this without sculpting tools in modo, but I'll use sculpting tools to add details on clothes. There are lots of details (stitches, wrinkles and so on) on the rider's suit and it might be very hard for me making them without sculpting tools.
I'll make the rider's suit next but before that I have to test subdivision surfaces and UVs with it both in modo and XSI and make sure differences between them.
 I put all details on this without sculpting tools in modo, but I'll use sculpting tools to add details on clothes. There are lots of details (stitches, wrinkles and so on) on the rider's suit and it might be very hard for me making them without sculpting tools.
I'll make the rider's suit next but before that I have to test subdivision surfaces and UVs with it both in modo and XSI and make sure differences between them.
Saturday, June 7, 2008

Saturday, May 31, 2008
a rider (1)
I've started making a rider.
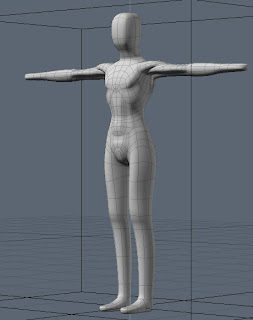

This base model will be naked. I'll make clothings and equipments afterward.
Though it will not have to be detailed, I'll make it slightly detailed because I may also use it for other projects.
This model is being made with modo. I'm not sure if modo's subdivision surface is similar to XSI's or not. If they are very different, I'll freeze the model with subdivision level 1 then bring it to XSI, or just adjust the model in XSI. Both UV maps won't be smoothed as I did in making barrels at the foot of light poles.
Monday, May 26, 2008
A port
I've made a floor, sea, sky and so on for the port.
The floor consists of polygon models and their instances. The sky was made from a polygon sphere.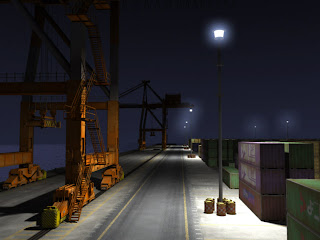
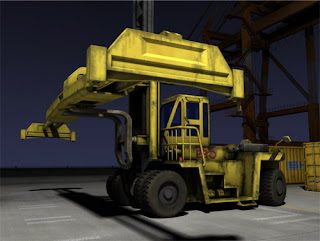 Though this scene is still lacking some elements, I'll make them and adjust this scene afterward. The next I'll make a rider.
The floor consists of polygon models and their instances. The sky was made from a polygon sphere.
In the image above I've rendered lights on light poles by a different pass from background's. The lights' pass has 2 partitions to fill lights or background with different colors (black and white). Then I put background's pass's pictures into Photoshop and added a new layer, then filled the lights area by using lights'pass's picture as a layer mask, then added an effect to the layer.

 Though this scene is still lacking some elements, I'll make them and adjust this scene afterward. The next I'll make a rider.
Sunday, April 6, 2008
A gantry crane (3)
I've finished making the gantry crane.
 In this image the upper part of the crane is lit up by some point lights. I'll add glows on the same positions of point lights.
Now I have containers, a top lifter, a gantry crane. I'll start to make a port with them. I may have to make some items to fill spaces.
 In this image the upper part of the crane is lit up by some point lights. I'll add glows on the same positions of point lights.
Now I have containers, a top lifter, a gantry crane. I'll start to make a port with them. I may have to make some items to fill spaces.
Subscribe to:
Posts (Atom)