
Sunday, December 28, 2008
Sunday, December 21, 2008

Sunday, December 14, 2008

Monday, December 1, 2008

Sunday, November 23, 2008
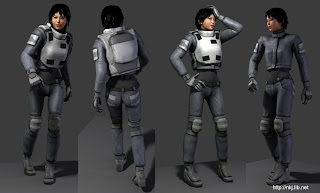
Uni (2)
I've made Uni's frame.
 I'm making Uni with SDS because I'm used to use it. I may be going to make a detailed model after freezing and make normal maps.
 I'm making Uni with SDS because I'm used to use it. I may be going to make a detailed model after freezing and make normal maps.
Saturday, November 15, 2008
Uni (1)
I started making Uni.
I've already made a rough model for making designs/storybords.
I've already made a rough model for making designs/storybords.
 I'll use this as a guide.
Sunday, November 9, 2008
Skinning (2)
I've finished skinning.
 I also set up highlights on eyes with using an environment texture. I think it is faster than using selective lights.
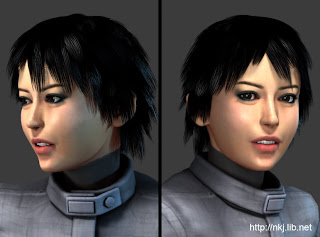 Still facial expression setups remain but I will make them after review the model. The next I will start making Uni.
 I also set up highlights on eyes with using an environment texture. I think it is faster than using selective lights.Still facial expression setups remain but I will make them after review the model. The next I will start making Uni.
Monday, November 3, 2008
Skinning (1)
I've started skinning.
 It's almost done but some areas still need adjustments. For example, knee outer covers have to be moved along with inner covers. In the right image they intersect (in the right knee.) I'll add extra joints which is moved by driven keys or expressions for them.
 It's almost done but some areas still need adjustments. For example, knee outer covers have to be moved along with inner covers. In the right image they intersect (in the right knee.) I'll add extra joints which is moved by driven keys or expressions for them.
Sunday, October 5, 2008

An arm rig
I've made a test model for an arm rig.
 This is a movie of those.http://www.youtube.com/watch?v=zdsckDkTMPs
And you can download sample data from this page:http://nkj.lib.net/sculpland/htmls/english/modeling/08modelinfos.html
 This is a movie of those.http://www.youtube.com/watch?v=zdsckDkTMPs
And you can download sample data from this page:http://nkj.lib.net/sculpland/htmls/english/modeling/08modelinfos.html
Thursday, September 25, 2008
A rider (11)
Now I can use Maya 2008. I've imported the rider's model and textures to it.
Maya's "smooth" has 2 methods: "Exponentially" and "Linearly". I used "Linearly" for head and its parts, and used "Exponentially" for body parts.
I made the rider's hairs. They have skeletons so that I can animate them.

Maya's "smooth" has 2 methods: "Exponentially" and "Linearly". I used "Linearly" for head and its parts, and used "Exponentially" for body parts.
I made the rider's hairs. They have skeletons so that I can animate them.

Tuesday, September 23, 2008
MEL script (2)
I made MEL procedures for making hairs for the rider. This can duplicate an object and set the generated objects on each point on an object radially.
Go to the MEL script(procedures)'s text page

Go to the MEL script(procedures)'s text page

Monday, September 15, 2008
MEL script
I've been going forward this project mainly with modo, Zbrush, XSI and Photoshop, and I decided to use Maya Complete 2008 too. I found a reseller giving a discount on Maya Complete 2008 for LightWave 3D's registered user, so I could purchase it at a low price.
Until I receive it I make some MEL scripts with my Maya Complete 4.0. This is a MEL script I made. You may be able to add an ik with control locators to an arm or leg skeleton with this. (You can use this with your own risk.)
Go to the MEL script's text page
 This script can do a simple task but this will help me because doing a task like this is annoying.
Until I receive it I make some MEL scripts with my Maya Complete 4.0. This is a MEL script I made. You may be able to add an ik with control locators to an arm or leg skeleton with this. (You can use this with your own risk.)
Go to the MEL script's text page
This script can do a simple task but this will help me because doing a task like this is annoying.
Sunday, August 31, 2008
A rider (10)
I've finished painting except for hair. (I'll remake it at the same time of skinning.)
 Basically the textures were painted or baked by modo and synthesized by Photoshop.
I used modo's Image Ink to paint fabrics. You can make a fablic like texture from a gray texture with using Photoshop's "waterpaper" filter. (I'm not sure about that filter's name in English version of Photoshop because I'm using a Japanese version of that.)
I made color textures which consist of ambient occlusion maps and displacement maps to emphasize suits' wrinkles. Those maps were baked by modo and then synthesized by Photoshop.
I took a look at web sites about cosmetics for making a face's textures because I had no knowledge about cosmetics. It was interesting.
The next I'll make a skeleton and its rigs. First I'll make an XSI script for making them.
Sunday, August 24, 2008

Tuesday, August 19, 2008
A rider (8)
After all, I sculpted the model with ZBrush then made normal maps and ambient occlusion maps with mode.
 The pipeline is like this.
1)Freeze a part of the model in modo, then export.
2)Sculpt it in ZBrush, then export.
3)Bake normal maps in modo.
4)Bake an ambient occlusion map with a model with a normal map in modo.
 The pipeline is like this.
1)Freeze a part of the model in modo, then export.
2)Sculpt it in ZBrush, then export.
3)Bake normal maps in modo.
4)Bake an ambient occlusion map with a model with a normal map in modo.
Sunday, August 3, 2008

Saturday, July 26, 2008
A rider (6)
I've finished making a base model of the rider.
 The next I'll start sculpting. I'll use modo for that, or I may use ZBrush. Also I'll use modo, ZBrush or XSI for baking normal maps. In either case, I'll make UVs first for normal maps.
 The next I'll start sculpting. I'll use modo for that, or I may use ZBrush. Also I'll use modo, ZBrush or XSI for baking normal maps. In either case, I'll make UVs first for normal maps.
Sunday, July 13, 2008
A rider (5)
I've updated the model a little bit.
 Since this model will have a skeleton I have to consider skinning. On each detail I decide if the detail should be baked to a normal map or not. Because a detail made by a normal map doesn't need points on an object, and it's obvious that skinning with few points is easier than with many points.
 Since this model will have a skeleton I have to consider skinning. On each detail I decide if the detail should be baked to a normal map or not. Because a detail made by a normal map doesn't need points on an object, and it's obvious that skinning with few points is easier than with many points.
Monday, June 30, 2008
A rider (4)
I've started making clothes.
 I'll make details with sculpt tools so the surface of these pants are almost flat so far. Now the legs are inside pants but they will be deleted.
 I'll make details with sculpt tools so the surface of these pants are almost flat so far. Now the legs are inside pants but they will be deleted.
Monday, June 23, 2008
Subdivision surface test
I've compared subdivision surface in modo and XSI.
 The original model is at the top of the image. A model in the right is applyed SDS in modo and then freezed. "Linear UVs" was checked before freezing. A model in the left is applyed Catmull-Clark subdivision surface in XSI. In UV, "Smooth when subdividing" is unchecked.
In the result, the UVs look similar. I think there will be no problem( or few problems) in UVs. In the mesh there is a problem that XSI's result is slightly larger than modo's. As far as I know, this kind of difference could be small if the mesh has enough of edges. In the rider's model there are enough edges except for the top of the head and teeth. I'll add edges to them to avoid the problem.

 The original model is at the top of the image. A model in the right is applyed SDS in modo and then freezed. "Linear UVs" was checked before freezing. A model in the left is applyed Catmull-Clark subdivision surface in XSI. In UV, "Smooth when subdividing" is unchecked.
 In the result, the UVs look similar. I think there will be no problem( or few problems) in UVs. In the mesh there is a problem that XSI's result is slightly larger than modo's. As far as I know, this kind of difference could be small if the mesh has enough of edges. In the rider's model there are enough edges except for the top of the head and teeth. I'll add edges to them to avoid the problem.
By the way, I improved the rider's model a little bit. I've adjusted the rider's upper body and added some details around the belly.
Saturday, June 21, 2008
A rider (3)
I've finished making the rider's base model.
 I put all details on this without sculpting tools in modo, but I'll use sculpting tools to add details on clothes. There are lots of details (stitches, wrinkles and so on) on the rider's suit and it might be very hard for me making them without sculpting tools.
I'll make the rider's suit next but before that I have to test subdivision surfaces and UVs with it both in modo and XSI and make sure differences between them.
Saturday, June 7, 2008

Saturday, May 31, 2008
a rider (1)
I've started making a rider.


This base model will be naked. I'll make clothings and equipments afterward.
Though it will not have to be detailed, I'll make it slightly detailed because I may also use it for other projects.
This model is being made with modo. I'm not sure if modo's subdivision surface is similar to XSI's or not. If they are very different, I'll freeze the model with subdivision level 1 then bring it to XSI, or just adjust the model in XSI. Both UV maps won't be smoothed as I did in making barrels at the foot of light poles.
Monday, May 26, 2008
A port
I've made a floor, sea, sky and so on for the port.
The floor consists of polygon models and their instances. The sky was made from a polygon sphere.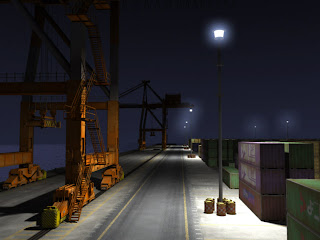
 Though this scene is still lacking some elements, I'll make them and adjust this scene afterward. The next I'll make a rider.
The floor consists of polygon models and their instances. The sky was made from a polygon sphere.
In the image above I've rendered lights on light poles by a different pass from background's. The lights' pass has 2 partitions to fill lights or background with different colors (black and white). Then I put background's pass's pictures into Photoshop and added a new layer, then filled the lights area by using lights'pass's picture as a layer mask, then added an effect to the layer.

 Though this scene is still lacking some elements, I'll make them and adjust this scene afterward. The next I'll make a rider.
Sunday, April 6, 2008
A gantry crane (3)
I've finished making the gantry crane.
 In this image the upper part of the crane is lit up by some point lights. I'll add glows on the same positions of point lights.
Now I have containers, a top lifter, a gantry crane. I'll start to make a port with them. I may have to make some items to fill spaces.
 In this image the upper part of the crane is lit up by some point lights. I'll add glows on the same positions of point lights.
Now I have containers, a top lifter, a gantry crane. I'll start to make a port with them. I may have to make some items to fill spaces.
Tuesday, March 18, 2008
A gantry crane (2)
I've made the lower part of the gantry crane.
 This image was rendered by XSI.I've made its render tree up in XSI. When I render this for animation, I'll make the render tree up again because I'll render this model with color texture and with ambient occlusion texture separately.
 This image was rendered by XSI.I've made its render tree up in XSI. When I render this for animation, I'll make the render tree up again because I'll render this model with color texture and with ambient occlusion texture separately.
Sunday, March 2, 2008
A gantry crane
I've made the base of a gantry crane.
 This time I made its ambient occlusion map by modo.
The gantry crane will have four of this base part. The height of the base is about 3.6 meter. The height of the gantry crane will be about 50 meter, but upper part of the crane does not have to be detailed because there will be just 1 closeup and backlight shot of its beam (cut number 12).
This time I made its ambient occlusion map by modo.The gantry crane will have four of this base part. The height of the base is about 3.6 meter. The height of the gantry crane will be about 50 meter, but upper part of the crane does not have to be detailed because there will be just 1 closeup and backlight shot of its beam (cut number 12).
Sunday, February 17, 2008
A top lifter (4)
I've finished making the top lifter.
These images were rendered by modo. This model will be rendered by XSI, so I'll have to make render trees up in XSI. I already have texture maps for that.

 I'll start making a gantry crane next.
These images were rendered by modo. This model will be rendered by XSI, so I'll have to make render trees up in XSI. I already have texture maps for that.

 I'll start making a gantry crane next.
Tuesday, February 12, 2008
A top lifter (3)
I've made ambient occlusion maps with XSI (modo also can make ambient occlusion maps).

 I'll use those maps to save rendering times.
 I'll use those maps to save rendering times.
Monday, February 4, 2008
A top lifter (2)
I've finished modeling a top lifter.

 I may have to bevel some edges, but it may not be a hard work. I'm making UVmaps next.
I may have to bevel some edges, but it may not be a hard work. I'm making UVmaps next.Saturday, January 26, 2008
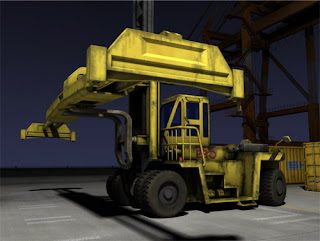
A top lifter
I'm making a top lifter. I'm making this instead of making a forklift in the storyboard.
 There will be 2 shots for the top lifter in the movie. In one of the shots the camera shoots Uni(uni-motorcycle) runs beneath a container hanged by this, so I have to make details in the forepart of this. On the other hand, I don't have to make its cockpit be detailed because the lighting will be dark and camera will move fast.
Saturday, January 19, 2008
A 40 feet container (2)
I've made varied textures for the container. I painted stain by modo, and coating by Photoshop Elements. An occlusion map generated by modo was also used for the textures.
 The models near by the camera are high-poly objects and the distant models are low-poly objects. Actually the low-poly objects are cubes. The low-poly object's textures were baked by modo.
A high-poly object has 3 2048*2048 textures for diffuse and specular. A low-poly object has a 512*512 texture for diffuse. I think textures for high-poly objects could be optimized and reduced its size. The left containers are low-poly and the right containers are high-poly.
The models near by the camera are high-poly objects and the distant models are low-poly objects. Actually the low-poly objects are cubes. The low-poly object's textures were baked by modo.A high-poly object has 3 2048*2048 textures for diffuse and specular. A low-poly object has a 512*512 texture for diffuse. I think textures for high-poly objects could be optimized and reduced its size.
The left containers are low-poly and the right containers are high-poly.
Saturday, January 12, 2008
a 40 feet container
First I'm making a 40 feet container. The containers will be the most seen object in the movie. It looks like just a box. Do you think it would be slightly boring to make this? I thought so, but references showed me some interesting features on it. It was fun to make them even they almost cannot be recognized from a distance. (Actually I'll bake the detailed model to a simple box model to make distant objects.)
This model was made and rendered by modo 301.

 I'll make variety of textures to make variations.
This model was made and rendered by modo 301.

 I'll make variety of textures to make variations.
Sunday, January 6, 2008
A storyboard and designs
I've made a storyboard and designs for this project to define what I will make.
 ( click this image to go to the archive page)
I'll use SOFTIMAGE XSI 6 Foundation, modo 301, Photoshop and so on for this project. I may be using some sort of movie editing software but I'll consider about it after making all scenes.
Friday, January 4, 2008
Subscribe to:
Posts (Atom)